Learning Paths
Last Updated: May 21, 2026 at 14:00
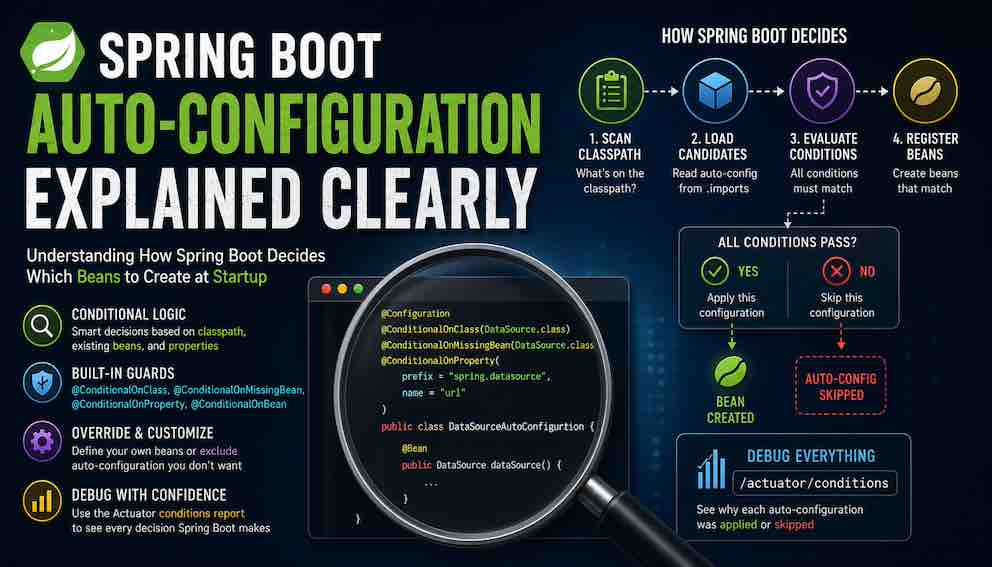
How Spring Boot Auto-Configuration Works (Explained Clearly)
Understanding Spring Boot Auto-Configuration Internals — How It Works, How to Override It, and How to Debug It
Spring Boot's auto-configuration feels like magic until you understand the simple conditional logic powering it. This article walks through exactly how Spring Boot decides which beans to create at startup — from classpath detection to the annotations that act as guards — so you can predict, override, and debug auto-configuration with confidence. You will also learn how to use the Actuator conditions report to inspect every decision Spring Boot makes, turning invisible behaviour into something fully transparent. By the end, Spring Boot will stop feeling automatic and start feeling predictable.
What Is Spring Boot Auto-Configuration?
Spring Boot applications have a habit of working before you understand them. You add spring-boot-starter-web, write a controller, and suddenly there is a running web server — without a line of server configuration in sight. That feeling of things happening you did not ask for is auto-configuration, and once you understand the mechanism behind it, Spring Boot goes from feeling unpredictable to feeling obvious.
Auto-configuration is Spring Boot's system for automatically creating and configuring Spring beans at startup. It makes decisions based on three things: what libraries are present on your classpath, what beans you have already defined yourself, and what properties you have set in your configuration files.
The important thing to understand is that none of this happens by luck or guesswork. Every auto-configuration class is guarded by a set of rules — things like "only proceed if this library is on the classpath" or "only create this bean if the developer hasn't already defined one". Spring Boot checks every rule before it does anything, and if any rule fails, that configuration is skipped entirely.
Think of it less like magic, and more like a checklist that runs silently at startup.
Part 1: How Auto-Configuration Works
The Entry Point: @SpringBootApplication
Every Spring Boot application starts with a main class annotated with @SpringBootApplication. This annotation is a shortcut that bundles three annotations together: @Configuration, @ComponentScan, and @EnableAutoConfiguration.
The annotation that drives auto-configuration is @EnableAutoConfiguration. When Spring processes it, a class called AutoConfigurationImportSelector runs and compiles a list of every auto-configuration candidate available on the classpath. How it finds that list is covered in the next section.
Where Auto-Configuration Classes Come From
Spring Boot needs a list of auto-configuration classes to evaluate at startup. That list comes from a file bundled inside the spring-boot-autoconfigure module:
This file is simply a list of fully qualified class names — one per line. When AutoConfigurationImportSelector runs, it reads this file and treats every class in it as a candidate. Those candidates then go through the conditional checks described in the next section.
You rarely add spring-boot-autoconfigure directly. It arrives as part of any starter you add — spring-boot-starter-web, spring-boot-starter-data-jpa, and so on. A starter's job is to pull in two things at once: the library you want to use, and the auto-configuration logic that knows how to set it up. The starter is the trigger; spring-boot-autoconfigure does the work.
The Core Engine: Conditional Annotations
Once Spring Boot has its list of candidates, it needs to decide which ones to actually apply. It does this using conditional annotations — annotations that act as guards on each auto-configuration class. Every guard must say "yes" before the configuration is applied. If any guard says "no", the entire configuration class is skipped.
Here are the four conditional annotations you will encounter most often.
@ConditionalOnClass checks whether a specific class is present on your classpath. For example, DataSourceAutoConfiguration is guarded by @ConditionalOnClass(DataSource.class). If you have not added a JDBC driver to your project, the DataSource class does not exist on the classpath, and the entire database auto-configuration is skipped.
@ConditionalOnMissingBean is the most important annotation for developers to understand. It says: only create this bean if no bean of this type already exists in the application context. This is the mechanism that lets you override any auto-configured bean by defining your own.
@ConditionalOnProperty checks your application.properties or application.yml. It can verify whether a property exists, or whether it has a specific value. You can use this to disable auto-configuration features with a single property.
@ConditionalOnBean is the counterpart to @ConditionalOnMissingBean. It says: only apply this configuration if a bean of a specific type already exists. This is useful for configurations that add behaviour on top of an existing bean.
To make this concrete, consider how Spring Boot might auto-configure an in-memory H2 database. The logic works like this: only proceed if the H2 driver class is on the classpath (@ConditionalOnClass). Only create the DataSource bean if the developer has not already defined one (@ConditionalOnMissingBean). And only do any of this if the developer has not already set a spring.datasource.url property (@ConditionalOnProperty). These conditions may be combined across a class and its individual methods, and Spring evaluates them collectively before deciding whether to register a configuration class.
The Startup Sequence, Step by Step
Understanding the order in which things happen matters, because timing affects which conditions evaluate to true or false.
First, SpringApplication.run() is called and the application context begins starting up.
Second, Spring scans the classpath. This scan records which classes and JARs are available, providing the data that @ConditionalOnClass checks will use.
Third, @EnableAutoConfiguration triggers AutoConfigurationImportSelector, which reads all AutoConfiguration.imports files on the classpath and compiles the full list of candidate auto-configuration classes.
Fourth, Spring processes your own configuration classes — the ones you wrote. Any beans you have defined are registered in the BeanFactory at this stage.
Fifth, Spring evaluates each candidate auto-configuration class by checking all its conditional annotations.
Sixth, for any auto-configuration class where all conditions pass, Spring registers its bean definitions. For any class where a condition fails, that entire class is skipped.
Seventh, Spring instantiates all registered bean definitions and the application finishes starting up.
The fact that your configuration is processed before auto-configuration runs is deliberate, and it is what makes overriding work correctly. Note that this is a simplified conceptual sequence; internally Spring uses multiple lifecycle phases and post-processors, so the actual execution order is more nuanced than these steps suggest.
Part 2: How to Influence Auto-Configuration
Understanding how auto-configuration works is only half the picture. The more useful question is: how do you control it? Spring Boot gives you four levers, and knowing which one to reach for in a given situation is what separates developers who fight the framework from those who work with it.
Properties are your first and most frequently used tool. Before doing anything else, check whether a property already controls what you need. Most auto-configuration behaviour can be shaped through application.properties or application.yml without writing a line of Java.
Bean overrides are for when properties are not enough. If you need full control over how a bean is constructed — custom logic, specific dependencies, non-standard configuration — you define your own @Bean and Spring Boot steps aside.
Exclusions are a last resort. Use them when a library on your classpath triggers auto-configuration you do not want at all, and there is no property to disable it cleanly.
The Actuator conditions report is not a configuration lever, but it belongs in this list because it is what you reach for when the other three are not behaving as expected. It shows you every decision Spring Boot made at startup and why.
The sections below cover each one in detail.
Using Properties to Shape Auto-Configuration
Properties are the most practical tool a developer has for influencing auto-configuration day to day. For most situations — connecting to a database, tuning a connection pool, toggling a feature — properties are all you need, and no Java configuration is required.
There are three ways properties influence auto-configuration.
Providing configuration values. Auto-configuration classes do not hardcode their settings. They read from your properties file, so the first thing you should do when Spring Boot auto-configures something you want to keep is check whether you can simply configure it with a property. Connecting to a real database is a good example. Rather than defining a DataSource bean yourself, you just provide the connection details:
Spring Boot's DataSourceAutoConfiguration picks these up and creates a fully configured DataSource. No Java configuration needed. This is the most common pattern and the one you will use most often.
Switching between implementations. When Spring Boot has a choice of implementations — connection pool providers, cache backends, embedded servers — properties let you select which one to use without touching your code. For example, Spring Boot defaults to HikariCP as its connection pool. To switch to Apache DBCP2:
You would do this when your organisation standardises on a particular library, or when you need features that the default implementation does not provide. The auto-configuration handles the wiring; the property makes the selection.
Disabling a feature entirely. Some auto-configuration classes check for a specific property before they do anything. If the property is absent or set to false, the entire configuration is skipped. This is useful in test environments, or when you want to bring in a starter for its dependencies without letting it configure anything.
For example, to prevent Spring Boot from auto-configuring security in a test context:
The general rule is: before writing a @Bean method to override something, check whether a property already does what you need. Spring Boot's documentation lists every supported property under the "Application Properties" reference. In most cases, the property exists and a few lines in your configuration file is all it takes.
Overriding Beans with Your Own Configuration
When properties are not enough and you need full control over how a bean is created, you define your own. Spring Boot will detect it and step aside.
The mechanism behind this is @ConditionalOnMissingBean. Because your @Configuration classes are processed before auto-configuration runs, your beans are already registered in the BeanFactory by the time auto-configuration evaluates its conditions. When an auto-configuration class checks @ConditionalOnMissingBean(DataSource.class), it finds the DataSource you defined, and the condition evaluates to false — Spring Boot does not create its own.
A typical example is customising the DataSource with connection pool settings that go beyond what properties expose:
One common mistake is defining a bean of the wrong type. If your bean does not match the type that @ConditionalOnMissingBean is checking for, Spring Boot will not detect it and will still create its own. If you are seeing unexpected duplicate beans, this is often the reason — check the exact type the auto-configuration is looking for.
Excluding Auto-Configuration You Do Not Want
Sometimes a library on your classpath triggers auto-configuration you do not want at all, and no property cleanly disables it. The most common example is the H2 database driver — just having it on the classpath causes Spring Boot to create an in-memory DataSource, which can conflict with your real database configuration.
In these cases, exclude the auto-configuration class directly. You can do this in two ways.
The first approach uses the exclude attribute on @SpringBootApplication:
The second approach uses an application property, which is useful when you want to avoid touching the main class or need to apply the exclusion in a specific environment:
Both achieve the same result: that auto-configuration class is removed from consideration entirely before any conditions are evaluated. Reach for exclusions when you have exhausted the property options — they are more blunt, and if Spring Boot ever changes how that auto-configuration works, an exclusion will silently bypass those changes too.
Debugging with the Actuator Conditions Report
When auto-configuration is not behaving as expected — a bean you expected is missing, or one you did not want keeps appearing — the Actuator conditions report is the fastest way to find out why.
To use it, add spring-boot-starter-actuator to your project:
Then expose the endpoint in your properties:
Once your application is running, visit /actuator/conditions. The report is split into two sections: positive matches (configurations that were applied) and negative matches (configurations that were skipped). For every negative match, you see the exact reason — a class was missing from the classpath, a bean already existed, or a property was set to the wrong value.
This is the report you check before anything else when debugging auto-configuration. It turns a guessing game into a five-second lookup.
A Mental Model to Hold Onto
Think of Spring Boot as a decision engine. At startup, it goes through its list of candidate configurations and silently asks three questions for each one.
Are the required classes present on the classpath? If no, skip this configuration entirely.
Has the developer already defined a bean of this type? If yes, use that bean and do not create another.
Do the configuration properties allow this feature to be enabled? If no, skip this configuration.
If all three answers allow the configuration to proceed, Spring Boot creates the beans.
That is the entire engine. Everything else in auto-configuration is detail built around this simple decision process. Once this model is clear, Spring Boot's behaviour becomes transparent — every bean has a reason, and that reason is always traceable back to one of these three questions.
Summary
Auto-configuration is a conditional logic system that runs at startup and makes decisions based on your classpath, your existing beans, and your configuration properties. The mechanism is driven by annotations like @ConditionalOnClass, @ConditionalOnMissingBean, @ConditionalOnProperty, and @ConditionalOnBean. Each annotation acts as a guard — all guards must pass before a configuration class is applied.
As a developer, you have four levers: properties to shape what gets configured, bean overrides to take full control, exclusions to remove unwanted auto-configuration entirely, and the Actuator conditions report to see exactly what Spring Boot decided and why. Reach for them in that order — properties first, exclusions last.
Your own beans always take precedence because your configuration is processed before auto-configuration runs. When auto-configuration checks @ConditionalOnMissingBean and finds a bean you have already defined, it backs off. This is the design: sensible defaults unless you say otherwise.
Once you understand how it works, Spring Boot's behaviour becomes explainable — you will know exactly why a bean exists, where it came from, and what it would take to change it.
About N Sharma
Lead Architect at StackAndSystemN Sharma is a technologist with over 28 years of experience in software engineering, system architecture, and technology consulting. He holds a Bachelor’s degree in Engineering, a DBF, and an MBA. His work focuses on research-driven technology education—explaining software architecture, system design, and development practices through structured tutorials designed to help engineers build reliable, scalable systems.
Disclaimer
This article is for educational purposes only. Assistance from AI-powered generative tools was taken to format and improve language flow. While we strive for accuracy, this content may contain errors or omissions and should be independently verified.