Learning Paths
Last Updated: May 21, 2026 at 14:00
How Spring Boot Startup Works: A Step-by-Step Guide for Java Developers
A practical deep dive into the full Spring Boot startup lifecycle — from JVM launch and configuration loading to bean creation, auto-configuration, proxies, and embedded server initialization.
Spring Boot applications appear deceptively simple on the surface, but an enormous amount of orchestration happens between calling SpringApplication.run() and serving the first HTTP request. This guide walks step-by-step through the entire startup lifecycle: how configuration is gathered, how components are discovered, how beans are created, how auto-configuration works, and how the embedded web server finally comes alive. Along the way, it explains the real mechanics behind dependency injection, proxies, transactions, lifecycle callbacks, startup events, and common failure modes. By the end, you'll understand not just what Spring Boot does during startup, but how to debug it confidently when something goes wrong.
That tiny main() method always looks too simple to be real.
Three lines. One annotation. One static method call. And yet within seconds you have a running web server, a database connection pool, dependency injection, REST endpoints, metrics, logging, and a dozen other systems all running.
This guide walks through exactly what happens between pressing "run" and seeing that Started Application in 2.4 seconds message - the sequence of events, explained clearly enough that you can use them to debug real problems.
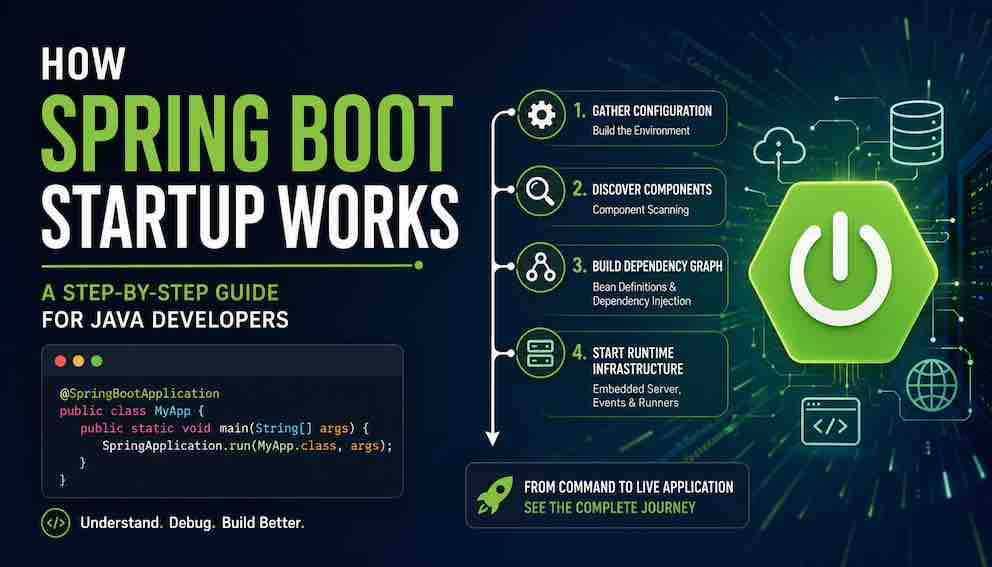
The Four Phases of Spring Boot Startup
Before diving into detail, here is the mental model that anchors everything else. Spring Boot startup does four things, in order:
Gather configuration. Properties files, environment variables, command-line arguments — everything gets collected into one place.
Discover and define beans. Spring finds beans from two sources: component scanning picks up every @Service, @Repository, @Controller, and @Component in your codebase, while auto-configuration contributes its own beans — the DataSource, TransactionManager, DispatcherServlet, ObjectMapper, and many others — based on what libraries are on your classpath. Both sources feed into the same bean registry.
Build the dependency graph. Spring figures out which objects depend on which other objects — whether those objects came from your code or from auto-configuration — and creates them all in the right order.
Start the runtime infrastructure. The embedded web server, scheduled tasks, messaging listeners — everything needed to actually serve traffic.
The JVM Runs Before Spring Does
When you start a Spring Boot application, Spring itself hasn't done anything yet. The Java Virtual Machine goes first.
The JVM wakes up, finds your fat JAR (that big bundle containing your code plus all the Spring libraries), and starts loading classes. It finds your MyApp class. It finds the main method. It hands control to that method.
Only then — inside main() — does SpringApplication.run() get called.
This distinction matters for debugging. Errors about classes not being found or a corrupt JAR happen before Spring even knows your application exists. They are JVM-level problems, not Spring Boot problems. Keeping that boundary in mind saves real debugging time.
Gathering Configuration — Building the Environment
Once SpringApplication.run() is called, the first major task is building the Environment — a single object that holds every configuration value the application will ever need.
Spring Boot pulls from roughly a dozen sources, in a defined order of precedence:
- Default properties set by @SpringBootApplication
- application.properties or application.yml in your project
- Profile-specific files like application-prod.properties
- OS environment variables
- JVM system properties (-Dmyprop=value)
- Command-line arguments (--server.port=9090)
The precedence order is documented and entirely predictable. Command-line arguments win over environment variables, which win over properties files, which win over defaults. When a setting is not behaving the way you expect, the first question to ask is: "Where is this value actually coming from?" There may be an environment variable you forgot, or a profile-specific file that is active.
A Note on Spring Profiles
Profiles let you activate different sets of configuration for different environments — application-prod.properties for production, application-dev.yml for development, and so on. Activate a profile via spring.profiles.active and Spring loads the matching file on top of the base configuration, with profile-specific values winning. Profiles also control which beans get created — a class annotated with @Profile("prod") is simply excluded from the application context when that profile is not active, which means the dependency injection graph itself changes depending on the active profile.
Creating the Application Context
With configuration in hand, Spring creates the ApplicationContext — the core container that will hold every object Spring manages for the lifetime of the application. It is the registry that makes dependency injection possible: when any part of your code needs a CustomerService or a DataSource, Spring looks it up here. The context doesn't contain any beans yet at this point — that happens during component scanning and auto-configuration — but it needs to exist first so beans have somewhere to land.
What Kind of Application Is This?
Before creating the context, Spring Boot figures out what type of application you're building. It does this by inspecting your classpath — the libraries you've included.
Tomcat or Jetty present? You get a servlet-based web context. Netty present? You get a reactive web context. Neither? You get a plain, non-web context.
You never configure this explicitly. Spring Boot infers it from your dependencies. This is a pattern you'll see throughout the framework: Spring Boot decides what to activate based on what it finds, not what you tell it.
Component Scanning — Finding Your Code
Now Spring scans your codebase for classes annotated with @Component, @Service, @Repository, @Controller, or @Configuration. By default it starts at the package containing your @SpringBootApplication class and scans everything below it.
This is why package structure matters. If a @Service class lives in a package above your main class, Spring will never find it. That scenario produces a confusing error that can take hours to track down if you don't know the rule. The fix is either to move the class or add an explicit @ComponentScan pointing at the right package.
At the end of scanning, Spring has not created a single actual object — it has only created bean definitions, which are recipes describing what class to instantiate and what dependencies it needs. The actual objects come later, during the dependency injection phase.
Auto-Configuration — Conditional Assembly
After component scanning, Spring Boot evaluates its auto-configuration classes — each one checks the classpath, the existing bean registry, and the properties in your Environment to decide whether to activate. When conditions pass, auto-configuration contributes infrastructure beans — DataSource, TransactionManager, DispatcherServlet, ObjectMapper, and others — directly into the same registry as your own beans.
The properties you set in application.properties, environment variables, and command-line arguments play a direct role here. Auto-configuration interrogates them to decide what to create — set spring.datasource.url and database infrastructure activates; leave it out and it doesn't. If you define a bean yourself, auto-configuration detects it and steps aside, so your explicit configuration always takes precedence.
Run your application with the --debug flag to see a full report of every auto-configuration class Spring Boot considered, whether it activated, and why — one of the most useful tools when something isn't wiring up as expected.
Bean Creation and Dependency Injection
Now Spring starts creating actual objects, working through the dependency graph it has assembled. At this point it has bean definitions from two sources — your components and auto-configuration — and it resolves them all together in a single pass. Your CustomerService and Spring's auto-configured DataSource are equals in this process: either can depend on the other, and Spring wires them the same way regardless of origin.
The process is recursive. CustomerService needs CustomerRepository. Spring creates the repository first, then creates the service and passes the repository in — typically through the constructor. If that repository needs something else, Spring resolves that first too.
This ordering happens automatically. You never tell Spring in what sequence to create beans. It figures that out from the dependency relationships.
Circular Dependencies
If ServiceA depends on ServiceB and ServiceB depends on ServiceA, Spring cannot resolve the graph and throws a BeanCurrentlyInCreationException — the right fix is to redesign the classes, as circular dependencies usually signal that one class has too much responsibility.
Lifecycle Callbacks
Once a bean is fully wired, Spring calls any method annotated with @PostConstruct — useful for initialisation logic that requires dependencies to already be in place.
Proxies and Cross-Cutting Concerns
During bean creation, Spring wraps some beans in proxy objects. The proxy sits in front of your bean and intercepts method calls to add behaviours like:
- @Transactional — starts and commits a database transaction around your method
- @Cacheable — checks the cache before calling your method; stores the result afterward
- @Async — submits your method to a thread pool instead of running it on the calling thread
- @Secured / @PreAuthorize — enforces security rules before the method runs
Your code doesn't change. The proxy handles the cross-cutting concern transparently.
The Embedded Web Server Starts
If you're building a web application, Spring Boot's auto-configuration includes a factory bean for an embedded web server — Tomcat by default, or Jetty and Undertow if you configure them. During the bean creation phase, Spring asks that factory to create and start the server.
The server binds to its port (8080 by default; change it with server.port). It initialises a servlet context and registers Spring's DispatcherServlet — the front controller that routes all incoming HTTP requests to your @Controller methods.
At this point your application is technically capable of receiving requests. But Spring waits to declare itself "ready" until everything else is in place.
Spring Boot Events — Hooking Into the Startup Sequence
Throughout startup, Spring Boot publishes events that let you run code at precise moments. The full sequence, in order:
- ApplicationStartingEvent — fires immediately at the start, before any processing begins
- ApplicationEnvironmentPreparedEvent — fires when the Environment is ready but before the context is created
- ApplicationContextInitializedEvent — fires after the context is created and context initializers have run, but before bean definitions are loaded
- ApplicationPreparedEvent — fires when bean definitions have been loaded into the context but before beans are instantiated
- ContextRefreshedEvent — fires after all beans are created, wired, and @PostConstruct methods have run
- ApplicationStartedEvent — fires after the context is fully refreshed but before CommandLineRunner and ApplicationRunner beans execute
- ApplicationReadyEvent — fires after all runners have completed, signalling the application is fully ready to serve traffic
- ApplicationFailedEvent — fires if startup fails at any point
The distinction between ApplicationStartedEvent and ApplicationReadyEvent is worth noting: if you need to run code after the context is ready but before runners execute, use ApplicationStartedEvent. If you need to run code once the application is completely live, use ApplicationReadyEvent.
To run code exactly when the application is ready, create a component that listens for ApplicationReadyEvent:
CommandLineRunner and ApplicationRunner
Spring Boot provides two simple interfaces for startup code: CommandLineRunner and ApplicationRunner. Both run after ApplicationStartedEvent and before ApplicationReadyEvent — meaning the context is fully refreshed and all beans are wired, but the application has not yet declared itself ready to serve traffic.
CommandLineRunner gives you raw command-line arguments as a string array. ApplicationRunner gives you a parsed ApplicationArguments object with named options and positional arguments separated. Both work the same way for most use cases.
One important detail: if a runner throws an uncaught exception, Spring Boot treats startup as failed and shuts down. Use runners for essential initialisation. For optional tasks, handle exceptions explicitly.
Reading the Startup Logs
Once you understand the phases, the startup log transforms from noise into a progress indicator. Here is a typical sequence:
Each line corresponds to a phase: the environment being built, the server binding its port, Hibernate initialising its persistence unit, and finally the readiness announcement. When startup fails, the last log line before the stack trace tells you which phase was active — and therefore where to look.
Why Is My Spring Boot App Starting Slowly?
Now that you understand the journey, diagnosing slow startup becomes systematic.
Excessive component scanning is a frequent culprit. If Spring is scanning your entire codebase — including test packages and generated code — that adds up. Narrow the scan with an explicit @ComponentScan targeting only the packages you need.
Heavy @PostConstruct methods block the startup sequence. Loading large files or making synchronous network calls in @PostConstruct delays the application from becoming ready. Move that work to a CommandLineRunner, where it runs after the server is already live and won't block the port from binding.
Unneeded auto-configuration evaluation. Spring Boot may evaluate hundreds of conditional configurations. Most won't match, but evaluation still takes time. Use the --debug report to identify configurations you know will never apply, then exclude them:
Bean count. Thousands of beans mean thousands of instantiation decisions. If startup is slow and the bean count is very high, check whether every bean truly needs to be a Spring-managed singleton.
For applications where startup time is critical — serverless functions, containerised services that scale to zero — Spring Boot 3 supports AOT compilation and GraalVM native image builds, which can reduce startup from seconds to milliseconds. These come with constraints on reflection and dynamic class loading, but are worth evaluating for latency-sensitive deployments.
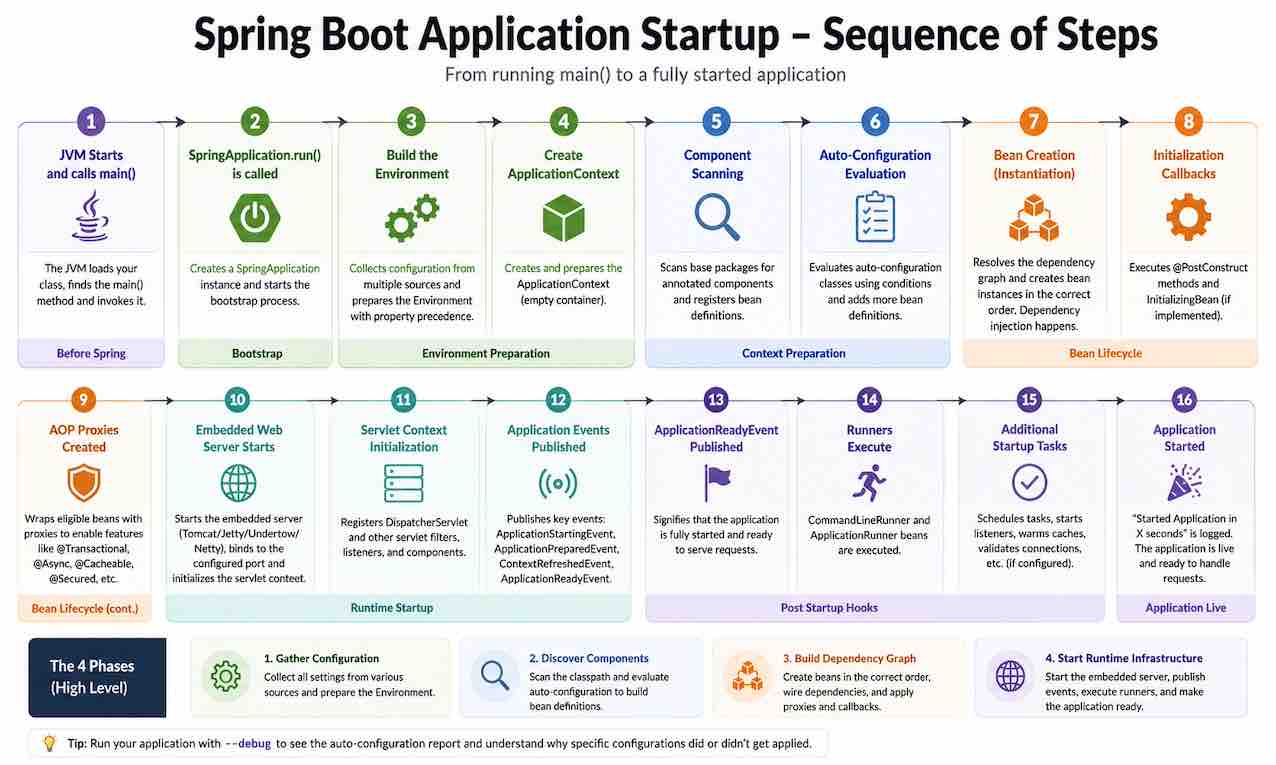
Spring Boot Application Startup Steps in Order
To tie everything together, here is the complete startup journey from command to live application:
- JVM loads your class and calls main()
- SpringApplication.run() is called; application type is determined from the classpath; ApplicationStartingEvent fires
- The Environment is built from all configuration sources, with precedence applied; ApplicationEnvironmentPreparedEvent fires
- The ApplicationContext is created and initializers run; ApplicationContextInitializedEvent fires
- Component scanning discovers annotated classes and creates bean definitions
- Auto-configuration classes are evaluated; matching ones add infrastructure beans — DataSource, TransactionManager, DispatcherServlet, ObjectMapper, and others — into the same registry as your own beans; ApplicationPreparedEvent fires
- Beans are instantiated in dependency order; @PostConstruct methods run
- Proxies wrap beans that need @Transactional, @Cacheable, @Async, etc.
- The embedded web server starts and binds to its port; ContextRefreshedEvent fires
- ApplicationStartedEvent fires
- CommandLineRunner / ApplicationRunner beans execute
- ApplicationReadyEvent fires — application is live
- Started MyApp in X seconds is logged
- On any failure at any point: ApplicationFailedEvent fires
Diagnosing Startup Failures: Which Phase Is It?
The most practical skill you can take from this guide is knowing how to locate a failure in the sequence.
Errors before Spring logs anything are JVM problems — classpath issues, corrupt JARs, missing classes.
BeanDefinitionStoreException means Spring found your component-scan packages but couldn't parse a configuration class — usually a syntax or import problem.
NoSuchBeanDefinitionException means a dependency couldn't be found during wiring — either the bean doesn't exist, is in an unscanned package, or a profile condition prevented it from loading.
BeanCurrentlyInCreationException means a circular dependency was detected.
Application starts but behaves wrong — a feature like @Transactional isn't working — points to a proxy issue (likely an internal this call bypassing the proxy).
Each error type points to a specific phase. When you know the phase, you know what to check.
Summary
Spring Boot's main() method is small because the framework absorbs complexity, not because the startup process is simple. It is actually a rich, ordered sequence of decisions: gather configuration, discover components, build a dependency graph, start the infrastructure.
Understanding that sequence turns Spring Boot from a black box into a system you can reason about, debug systematically, and tune deliberately. The next time startup fails or misbehaves, you won't need to guess — you'll know exactly which phase to investigate.
About N Sharma
Lead Architect at StackAndSystemN Sharma is a technologist with over 28 years of experience in software engineering, system architecture, and technology consulting. He holds a Bachelor’s degree in Engineering, a DBF, and an MBA. His work focuses on research-driven technology education—explaining software architecture, system design, and development practices through structured tutorials designed to help engineers build reliable, scalable systems.
Disclaimer
This article is for educational purposes only. Assistance from AI-powered generative tools was taken to format and improve language flow. While we strive for accuracy, this content may contain errors or omissions and should be independently verified.